Scrapbooking Articles

Showing posts with label scrapbook project. Show all posts

Monday, May 10, 2010

Creating Digital Scrapbooking Layouts - Resizing Your Photos

Creating Digital Scrapbooking Layouts - Resizing Your Photos

If you are new to creating digital scrapbooking layouts, there are a few skills you will want to master early on. One of these is: How Do I Resize a Digital Photograph to fit the digital template I've chosen?

Let's look at a typical scenario:

  • A new mom has taken tons of pictures of her child (what new mother doesn't?)
  • She loves scrapbooking, and wants to create a mini-album with digital layouts featuring several small photos, or just part-photos, on each page.
  • She plans to use mostly head shots, and the standard 6x4s are too large for use on her page.
  • She wants to be able to print the multi-photo page(s) as a part of her mini-album.
She already has Photoshop Elements, but you'd follow the same overall process for most photo-editing software.

First, Open a Blank Canvas, then

  • Define the size and resolution of the page (250-300 dpi should give a good result when printing the page)
  • Choose RGB color mode, unless you want a monochrome grayscale finish
  • Set background color to transparent
You now have a canvas and are ready to start scrapbooking

Side Note: I find the checkered background you see (when color is set to transparent) makes it very easy to align photos and embellishments.

In PhotoShop each part of your design will be placed on a separate layer and you can adjust how far forward an item is by moving it up and down the layers.

Next, Open the Photo File to be resized.

There are now several options to resize your photo:

  1. Simply make the whole photo larger or smaller.
  2. Crop to a section of the photograph, thereby removing all that extra sky or foreground, then sizing the cropped image to what you need.
  3. Use a mask which is an easy way to create identically sized photographs in a multi-photo layout.
1. Resize your whole Photograph:

  • Go to Image, resize, image size
  • in the 'Document size' section select your units (inches, mm, cm, pixels, etc) and enter the width or height you want
  • you will want a resolution of 250-300 dpi to get good printing results
2. Crop a Section of the Photo:

  • Select the crop tool and define the area to be kept
  • Drag the crop 'window' around your photo to make the best selection
Side Note: if you want several photos exactly the same size in a layout I recommend using one of the fixed options instead of the freehand ones.

3. Use a Mask to Reveal only the Part of your Photos You Want to Display:

This is a technique I wish I'd learned about much earlier in my journey into Digital Scrapbooking...

  • Create a new layer and select the Marquee Tool
  • Select the size you want (choose from freehand, fixed ratio, or fixed size options)
if you chose either the fixed ratio or freehand option:

  • Draw your mask shape on the new layer while holding down the left button on your mouse;
If you chose the fixed size option: (good when you want multiple images the same size)

  • Click on your new layer, and the fixed size you've chosen will appear in outline with the 'marching ants'
Whichever style you used, the next stage is to

  • Select the Paint Bucket Tool and fill the shape with color (just so that its easier to see while you are working)
Now you have a photo mask layer ready for use in your current project. You can also duplicate the layer for as many photos as you plan to use.

  • Place your photo on the layer above the photo mask, and clip the two layers together. You can still move your photo to select the best part, and you can grab a corner to adjust the size.
Do this for each photo until you have all you need for your digital scrapbooking layouts.

Genie Balfour: As a paper crafter and scrapbooker for many years, Genie is well-versed in the ins and outs of paper and digital scrapbooking. As the founder of the popular website ScrapbookingGems.com, she writes regularly on paper and digital scrapbooking topics.

Click this link to read Genie's step by step photo resizing instructions and other digital scrapbooking layout tips. Or click here and check out her free scrapbook sketches and layouts series.

Thursday, March 5, 2009

Two Thumbs-Up For Digital Scrapbooking

Two Thumbs-Up For Digital Scrapbooking

Well, this is Gina Chen, Family Life editor, busting into Scrapbook Mom's blog again. This time I just have to tell you about my experience with digital scrapbooking.

I tried it for the first time a few weeks back. We had gone to California to visit my in-laws, and we were wracking our brains to come up with a gift to thank them for their hospitality. I decided a scrapbook of the trip would be a great gift, but I knew there was no way I'd have the time to do a traditional scrapbook.

So I decided to go digital. It was great.

I've been scrapbooking the traditional way -- with stickers and paper -- for about 12 years, and I've finished more than 10 albums that way. I love doing it. I love expressing my creativity, reliving our family fun and chatting with my girlfriends.

But going digital had one big draw: speed. In about three hours I had an album done.

I selected my pictures, uploaded them, added captions and headlines. I used Creative Memories free software, so I had follow the pre-determined picture format. (But it's free!)

It was simple to use. Point, click and move a picture. I could change the color of the text. I could put a picture on the cover and a title. It allowed me to do all the basics things one would want, although eventually I'd probably spring for the $59.95 program. That allows you more flexibility and choice in picture placement, size, embellishments.

A few days after I put my digital scrapbook together, I proofed it, tweaked a few things, ordered it. Less than a week later, it had arrived at my in-laws' home. They loved it. I haven't actually seen the finished copy because I sent it directly to them, but my father-in-law's thank you e-mail speaks of it being of high quality.

This doesn't mean I'm ready to turn in my page trimmer and circle cutter. I still much prefer old-fashioned scrapboooking mainly because I love the social aspects of scrapbooking. (In fact, tomorrow I'm spending the day at National Scrapbooking Day) But to do something different, scrap an album quickly or make a gift, you can't beat going digital.

Anyone else have experience with digital scrapping? Please share.

Taken From Syracuse.com

Saturday, January 31, 2009

How to Scrapbook Your Own Day Planner!

How to Scrapbook Your Own Day Planner!

Try finding a day planner that affords you the space to stamp and scrapbook month to month! You can create your own monthly masterpiece by applying your favorite photo on an index tab divider, or even on a sturdy calendar page itself.

Apply you favorite stickers and stamps to significant dates to remember or celebrate. Consider tacking pictures of those who will celebrate memorable moments such as birthdays, anniversaries or graduations on the index tab dividers for each month.

Some planners even have a covers that have picture pockets that you could easily modify with the passing seasons! Changing the look of your day planner cover will keep it fresh and exciting all year long.

Try inserting a few mini scrapbook pages within the planner itself. Sharing your favorite photo masterpieces can be as easy as reaching for your purse.

Your creative scrapbooking is meant to be shared and enjoyed. Scrapbooking the pages of your planner could also serve to promote a business, whether its stamping, scrapbooking or day care! Share your talents each and every time you open your planner to make an appointment or just to jot down a note or two.

Adding your own personal scrapbooking touch to your day planner or calendar will encourage you to be more organized and will inspire at the same time!

It can make a great personal gift for you or someone you love. Enjoying the space we live in makes everyday a little easier. Have fun and get scrap happy in January right on through to December!

Author, Tammy Matthews, is a mom of three and creator of the Bizzi2Go Planner. For more information please visit: http://www.bizzimom.com

Sunday, August 24, 2008

Scrapbooking Tips For Your Invitations Of Marriage.

It becomes increasingly popular to conceive the single invitations of marriage. The declaration with your family and friends whom you will marry is one special moment, and you can create some manners amusaèves of announcing them your plans for this special day!

Your single invitation of marriage is your first impact on your family and friends about your marriage. It is the first stage towards your marriage. You can depict to feel it totality of your day of the marriage in your single invitations of marriage.

If you are a jokester, you could want to do something which will mystify them at the beginning and then you can announce at the person that you marry. If you are romantic, you could want to create a quotation of your experiment with your been engaged and how you consider your life will be as like a couple wedded.

If you are an occupied person who travels much, you could choose to send the advertisements outside to your family and friends who show your love of voyage. A single idea of invitation of marriage is to create the plane tickets false which have an image far with far from a destination (or of much far with far from destinations if you desire).

That have your specific information of marriage printed on the � of “ticketâ€. If you like the time and the money of economy, you can send your advertisements like easy and creative invitation single complete of marriage. There is a broad set of the models to choose of by selecting your own invitations of marriage, if you want to do it the formal manner with a gracious single invitation of marriage.

Your basic elegant colors: black, white, silver plated and gold are always an astonishing manner to conceive your invitation for a formal business. However, and your fiancé be distinctive for you. If you want to show your individuality, you need one or the other find that a place which can help you to adapt your invitations or you can conceive your own single invitations of marriage.

You can conceive something exclusive that nobody could find in any " of ½ of ¿ of ï of store; in line or with far. You can employ astounding colors, or the earthy colors invite the family and the friends with your ceremony of marriage. The majority of the couples choose to conceive their invitations of marriage around their colors wedding chosen, however you can choose to make the opposite.

A fantastic manner to conceive your own single invitation of marriage is to visit a store scrapbooking. You can find all the materials which you can imagine to conceive your own imaginative and single invitations of marriage. You could have a time crafty one to obtain your fiancé to be implied by doing them, however.

However if you ask him that to carry out an easy task of invitation for you (like putting the chart of RSVP inside the invitations carried out) and to make your request resemble He relieves much of weight in addition to your shoulders, should easily obtain the assistance to you which you want.

Not to forget to have the recreation with finding the good invitations of marriage for you and your fiancé. By maintaining it similar to your own interests, your own single invitation of marriage will become an enormous memory to remember your very special day.

Tuesday, July 22, 2008

Creating a Wedding Scrapbook

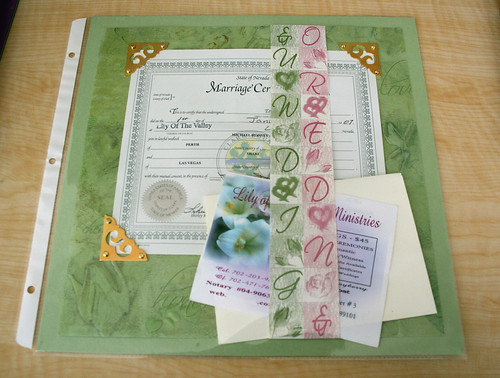
A scrapbook of a wedding is different than a photo album of a wedding. I believe a photo album is to showcase the photos taken at the wedding. I believe a scrapbook of the wedding is to share the story of the days/years leading up to the wedding and then share photos of the event itself.

The following suggestions are just that, suggestions. There is no right or wrong in creating a scrapbook. It is my goal to provide some thought starters to creating a wedding scrapbook.

Consider starting with a few photos of both the bride and the groom as children. Add a few photos of them as teens and then some photos of the couple during the dating process.

During the planning stages, often banquet rooms are looked at, dresses and tuxedos are looked at, and invitations are looked at. Taking a few photos of the various planning days are great additions to the scrapbook. If the bridal shop will allow it, it can be fun to take photos of the bride in each dress she tries on.

When you decide on a banquet room, take a few photos of the room empty. Take a few photos of the building housing the banquet room.

Once a menu is decided on, save a copy of the menu provided by the banquet room. One event I helped with, we actually made the menu ourselves. We wanted guests to know what was being served that night and so we included our self made menu in the scrapbook.

You’ll also want to save one copy of all of the following:

• An invitation

• An R.S.V.P. card

• A place card

• A thank you note

• A copy of the guest list

If you order candy bar wrappers, or any other wedding favor, save one for your scrapbook. If you use a D.J. or a band, save one of their business cards, or one of their brochures, to include in your scrapbook. If you hire any other type of entertainer, again, save a business card or brochure.

As you plan your wedding, it can be fun to journal the days. There will always be mishaps along the way and as you are celebrating your first anniversary, you will laugh over the mishaps and the other notes you took as you planned.

When the R.S.V.P. cards come in, often times folks will write personal messages. Save those. Just like a high school yearbook, it’s fun to go back and read what others wrote, several years later. And now, the day of the wedding has arrived. It’s time to take those photos that you’ll want for both your wedding photo album and also your wedding scrapbook.

Audrey Okaneko has been scrapbooking for several years. She can be reached at audreyoka@cox.net or visited at http://www.scrapping-made-simple.com

by Audrey Okaneko

Sunday, July 13, 2008

Wedding Scrapbook Albums - They're Not Just For Brides and Grooms

These life changing, always memorable events are frequently the catalysts for nuptial-themed scrapbook albums. But true creative scrapbooking artisans have come to realize that only one wedding scrapbook might not be enough!

Here Comes the Bride... Her Dad... Your Cousin... The Neighbors...

Take a moment to consider how many people are in attendance at the typical wedding. Aside from the bride and groom, there are usually bridesmaids, groomsmen, attendants, flower girls and ring bearers. Add to that the plethora of family members and friends-fathers, mothers, sisters, brothers, former roommates, school chums, grandparents-and you have a bounty of people for whom scrapbook albums would be perfect mementoes.

Of course, this is great news to the professional scrapper who desires to make a partial living off her creative scrapbooking abilities, selling her innovative scrapbook albums by the dozen.

It's also terrific for the recreational scrapbooking fan (and new bride!) who wants to test her skills at arranging wedding scrapbook albums as a "thank you" for everyone who attended her special day.

But no matter who is putting together the scrapbook (seasoned scrapper or newbie artist), it's critical to have a plan in place before setting off on this exciting adventure. Otherwise, you could find yourself with tons of scrapbooking embellishments and few finished projects.

The Wedding (scrapbook album) Planner

The key to arranging phenomenal wedding scrapbook albums is to develop a strategy before ever lifting a gel pen or unpeeling a sticker. This game plan can be as intricate as you need. Some scrappers prefer to simply write down the names of recipients for whom they'd like to make albums and then jump right in to their work. For them, a simple list is enough of a guideline.

Other scrapbooking gurus prefer to establish a more comprehensive blueprint, describing their intended scrapbook albums in greater detail (e.g. including approximate number of pages, size of album, theme of album, anticipated scrapbook products.)

Regardless of your organizational style, once you've written down at least a general idea of how you want to create your wedding scrapbook albums, it's time to check your scrapbook accessories. (Nothing's worse than finding out you've run out of card stock in the middle of a fun project!)

Evaluate your inventory, then decide whether you need to purchase scrapbook supplies online or if you have enough items in your scrapbooking kit. If you're unsure as to whether you need more, know that it's always better to have a little too much.

Making Memories Come Alive Again

Your next step will be to sort applicable photos and nostalgic items for inclusion in the wedding scrapbook albums. Simple enough, but don't breeze through the process.

For instance, if you're creating an 8-page scrapbook for your six-year-old niece who served as your flower girl, you'll want to create a very special scrapbook using photos of her (don't forget about those silly candids that make such delightful creative scrapbooking items!) If you have dried flowers, pictures of flowers or even flower-themed scrapbook products, you could add them, too.

Taking this hypothetical creative scrapbooking scenario a step further, you could also choose card stock that mirrors the colors (and perhaps fabrics) of both your wedding and your flower girl's dress. Remember-there's no "right" or "wrong" way to arrange scrapbook albums, but they should have a strong sense of originality and personality.

I Do... Thank You

Once your scrapbook albums are completed, the method of transporting them is entirely up to you.

Sent in the mail to friends and relatives who took part in your marriage ceremony, wedding scrapbook albums make a lovely surprise. Of course, a face-to-face delivery is a powerful way to say, "Thanks for being a part of our marriage", too.

In the end, your creative scrapbooking generosity will not go unnoticed, and the thoughtful scrapbook albums you've produced will be treasured for generations to come.

Michele Cardello, director of marketing and creative for Life Imprints, a creative scrapbooking supplies company also offering contemporary picture frames, in Cleveland, Ohio, has worked in the photo packaging industry for 10 years. Cardello helps customers find creative ways to preserve and appreciate a lifetime of memories.

by Michele Cardello

Capture That Special Day with a Wedding Scrapbook

Nothing is more special than the union of two people, and a wedding can be the inspiration behind starting to take up scrapbooking as a hobby. Wedding scrapbooks ensures that the day of joy and celebration lives. A couple can bond through reminiscing on the feelings and events of their weddingand can be captured through your wedding scrapbook.

Your Wedding Scrapbook is more than just memories

It is clear that as time goes by so do the memory of events in our lives. Your scrapbook can be worked on as a present to yourself and others in the future. The crucial thing to remember when starting your wedding scrapbook is that you need to work on layouts. This will ensure that you have a firm foundation upon which the wedding pictures will be showcased.

Wedding scrapbooking is more than just putting pictures into a fancy book. It is a story of its own that can be retold with the visuals provided, and in the end you could use your wedding scrapbook for your children to see and experience the beginnings to their past.

Helpful tips for creating Wedding pages

You do not have to feel alone and overwhelmed with your project. There is a whole lot of help to be found so that you get the right steps in making your wedding scrapbook project a reality. You can often go to search engines and find out how to tackle the project and get some great advice. There are books and magazine written out there that will help with layouts and techniques you can use to liven up your pages.

Save your favors, cards and wrapping papers to add dimensions to your pages. If you haven't had you wedding yet, try having your guests write a special moment they remember of you or your spouse and leave it is a vase at the guest table. Use these thru your scrapbook pages as part of your journaling.

Remember that a scrapbook is a journal as well as a photo album. Take the time to write memories down shortly after your wedding so you don't loose the little details that you remember so much at the time. A great way to do this would be to write them on the back of family pictures when they are returned from the store.

Find a color combination that will bring the colors of your photos out. Try and stay with that theme thru out the book.

At the end of your project, remember that this will be a cherished family gift for years to come for all to enjoy.

Marcy Larsen - Close To My Heart Consultant. CTMH offers much more than just scrapbook supplies, including opportunities to make money while scrapbooking. I love to help people get started in scrapbooking. To learn more, please visit my website at http://www.marcylarsen.com.

by Marcy Larsen